Meet us at WordCamp | ShopTalk | DrupalCon Conferences to explore our solutions. Know More
WP REST API Authentication Setup Guide
- Basic Authentication
- API Key Authentication
- JWT Authentication
- OAuth 2.0 Authentication
- Third Party Provider Authentication
 We have provided below Authentication Methods in our WordPress plugin.
1. Username:Password
2. Client-ID:Client-Secret
1. Password Grant
2. Client Credentials Grant
- Basic Authentication: If you want to protect your WP REST APIs(eg. post, pages and other REST APIs) with users login credentials or client-id:client-secret, then you can opt for this method. It is recommended that you should use this method on HTTPS or secure socket layer.
- API Key Authentication: If you want to protect your WP REST APIs(eg. post, pages and other REST APIs) from unauthenticated users but you don’t want to share users login credentials or client id, secret to authenticate the REST API, then you can use API Key authentication, which will generate a random authentication key for you. Using this key, you can authenticate any REST API on your site.
- JWT Authentication If you are looking to protect your REST APIs using the JWT token and if you do not have any third party provider/identity provider that issues the JWT token, then you should go for JWT Authentication method. In this case, our WordPress REST API Authentication itself issues the JWT token and works as an API Authenticator to protect your REST APIs.
- OAuth 2.0 Authentication: If you are looking for protecting your REST APIs using the access-token and at the same time you do not have any third party provider/identity provider, then you should go for OAuth 2.0 Authentication method. In this scenario, our WordPress REST API Authentication works as both OAuth Server and API Authenticator to protect your REST APIs.
- Third Party Provider Authentication: If you are looking for protecting/restricting access to your WP REST APIs using your OAuth Provider/Identity provider, then you should go for Third Party Provider Authentication method.
 Applications/Use-Cases:
Here, you just need to configure the plugin with Introspection Endpoint/User Info Endpoint provided by your Identity Provider and you will be able to authenticate the API Request using the token provided by your provider application.
- Basic Auth using UserName & Password :
Basic Authentication:
-
1. Select your Authentication method ->Basic Auth and Authentication Key -> Username:Password and click on Save Configuration as shown below.

2. After you save the Basic Auth Configuration, to access the WordPress site, you need to send an API request with your respective Authorization Key. You need to use the request format as shown below.
Request: GET https://<domain-name>/wp-json/wp/v2/posts
Header: Authorization : Basic base64encoded <username:password >

Sample request: GET https://<domain-name>/wp-json/wp/v2/posts
Header: Authorization : Basic eGw2UllOdFN6WmxKOlNMRWcwS1ZYdFVrbm5XbVV2cG9RVFNLZw==
-
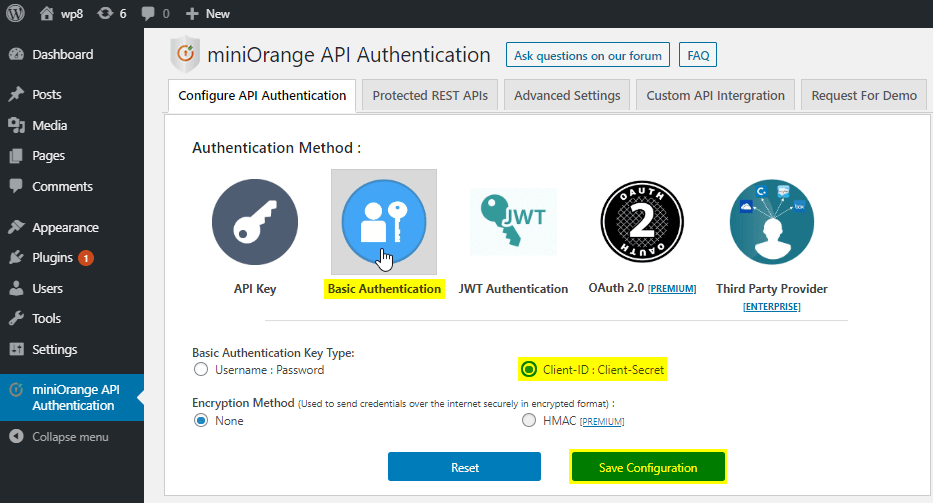
1. Select your Authentication method ->Basic Auth and Authentication Key -> Client-ID:Client-Secret and click on Save Configuration as shown below.
2. After you save the Basic Auth Configuration, user need to send a API request with your respective Authorization Key to access the WordPress site. You need to use the request format as shown below.
Request: GET https://<domain-name>/wp-json/wp/v2/posts
Header: Authorization : Basic base64encoded <client-id:client-secret>

Sample request: GET https://<domain-name>/wp-json/wp/v2/posts
Header: Authorization : Basic eGw2UllOdFN6WmxKOlNMRWcwS1ZYdFVrbm5XbVV2cG9RVFNLZw==
API Key Authentication
-
1. Select your Authentication method ->API Key and click on Save Configuration as shown below.

2. Once you save the configuration, you will get the option to Generate New Token, click on Generate New Token button. This token will get expired when you generate a new token.
3. Once you generate the API Key(token), you can use it to secure your WordPress page / post.
4. Users who have this token can access API as shown below.
Request: GET https://<domain-name>/wp-json/wp/v2/posts
Header: Authorization : Bearer <token>

Sample request: GET https://<domain-name>/wp-json/wp/v2/posts
Header: Authorization : Bearer kGUfhhzXZuWisofgnkAsuHGDyfw7gfhg5s
JWT Authentication
-
1. Select your Authentication method ->JWT Authentication and click on Save Configuration as shown below.
- To get the JWT Token, you would need to make an API Call to Token endpoint as below
Request: POST https://<domain-name>/wp-json/api/v1/token Body: username = < wordpress username > &password = < wordpress password > - Once you get the JWT token, you can use it to request the access to the WordPress site as shown below.
Request:
GET https://<domain-name>/wp-json/wp/v2/posts

Header:
Authorization : Bearer < JWT token >

2. Here you would need to make two calls:
-
i. To get the JWT Token
ii. To Send an API Request
Step 1 : Get the JWT Token
Step 2 : Send API Request
Note : Above token is valid for 1 hour. Users have to create a token each time they want to request the API access.
OAuth 2.0 Authentication
- OAuth 2.0 using Password Grant :
- To get the access token/JWT Token, you would need to make an API Call to Token endpoint as below
Request: POST https://<domain-name>/wp-json/api/v1/token Body: grant_type = < password > &username = < wordpress username > &password = < wordpress password > &client_id = < client id > - Using Refresh Token
Request: POST https://<domain-name>/wp-json/api/v1/token Body: grant_type = < refresh_token > &refresh_token = < Refresh Token > - Once you get the access_token / id_token, you can use it to request the access to the WordPress site as shown below.
Request:
GET https://<domain-name>/wp-json/wp/v2/posts

Header:
Authorization : Bearer < access_token / id_token >
-
1. Select your Authentication method ->OAuth 2.0 and OAuth 2.0 Grant Type -> Password Grant & Token Type->Access Token/JWT Token based on your choice and click on Save Configuration as shown below.

2. Once you click on the save configuration, you will get the Client ID, Client Secret & Token Endpoint.
3. Here you would need to make two calls:
-
i. To get the Token
ii. To Send an API Request
Step 1 : Get the Token
Step 2 : Send API Request
Note : Above token is valid for 1 hour. Users have to create a token each time they want to request the API access.
- OAuth 2.0 using Client Credentials Grant :
- After saving above configuration, you will get the Client ID, Client-Secret & Token Endpoint.
- To get the token, you need to send a token request as shown below
Request: POST https://<domain-name>/wp-json/api/v1/token Body: grant_type = < client_credentials > &client_id = < client id > &client_secret = < client secret > - Using Refresh Token
Request: POST https://<domain-name>/wp-json/api/v1/token Body: grant_type = < refresh_token > &refresh_token = < Refresh Token > - Once you get the access_token / id_token, you can use it to request the access to the WordPress site as shown below.
Request:
GET https://<domain-name>/wp-json/wp/v2/posts

Header:
Authorization : Bearer < access_token / id_token >
-
1. Select your Authentication method ->OAuth 2.0 and OAuth 2.0 Grant Type -> Client Credentials Grant & Token Type->Access Token/JWT Token based on your choice and click on Save Configuration as shown below.

2. Once you click on the save configuration, you will get the Client ID, Client Secret & Token Endpoint.
3. Here you would need to make two calls:
-
i. To get the Token
ii. To Send an API Request
Step 1 : Get the Token
Step 2 : Send API Request
Note : Above token is valid for 1 hour. Users have to create a token each time they want to request the API access.
Authentication using Third Party Provider
-
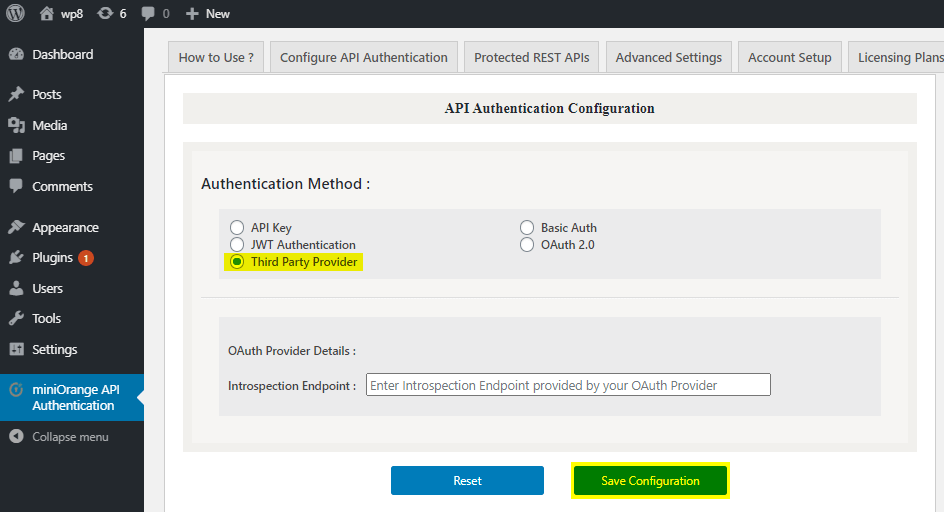
1. Select your Authentication method ->Third party Provider and add Introspection Endpoint provided by your OAuth/OpenID Connect provider and click on Save Configuration as shown below.
2. Once you configure the plugin with Introspection Endpoint provided by your provider, try to access your WordPress page/posts using the access token/id_token provided by your OAuth Provider as shown below.
Request:
GET https://<domain-name>/wp-json/wp/v2/posts

Header:
access_token : < access_token >
OR id_token : < id_token >
×
![]()
Hello there!
Need Help? We are right here!
